

For most collectors and sellers, the right scanning method comes down to one question: what are you doing with the card afterward? Use a CCD flatbed for slabbed or archival captures, a contactless overhead scanner like the ScanSnap SV600 for delicate or reflective cards, a sheet-fed feeder like the Fujitsu fi-8170 or fi-8250 for high-volume raw card batches, and a mobile app like TCGplayer, Ludex, or MTG Master for fast identification and casual inventory. Never feed cards in soft penny sleeves through a roller-based feeder; the rollers can crease or nick card edges in seconds.
Quick use-case matrix:
- Archival preservation: CCD flatbed at 600–1200 DPI, PNG or TIFF, no auto-corrections
- Graded slabs: CCD flatbed (lid open, dim room) or contactless SV600-style overhead
- High-volume raw card batches: Sheet-fed feeder (fi-8170 or fi-8250) with batch export and CSV
- Quick identification and set-building: Mobile app (TCGplayer, Ludex, MTG Master)
- Chrome, prism, or reflective finishes: Contactless overhead or CCD flatbed with lid open
Key Takeaways
A CCD flatbed or contactless overhead scanner is the right tool for slabbed and high-value cards; sheet-fed feeders handle raw card volume; mobile apps serve identification and light inventory only.
| Point | Details |
|---|---|
| Match scanner to card type | CCD flatbed or SV600 for slabs; fi-8170/fi-8250 feeders for raw card batches; mobile apps for quick ID only. |
| Archival settings | Capture at 600–1200 DPI, save as PNG or TIFF, and disable all auto-corrections to preserve condition evidence. |
| Never feed slabs or penny sleeves | Sheet-fed rollers damage slab holders and can crease cards in soft sleeves; use contactless or flatbed instead. |
| Export CSVs for seller workflows | Map scan session exports to listing platform fields (title, set code, card number, condition, price, image filename). |
| Nextgencards inventory | Nextgencards offers rare rookie autographs, relics, and patch cards that benefit from proper archival scanning and condition-documented listings. |
Table of Contents
- What does a solid card scanning guide actually recommend for hardware?
- How do you run a scanning session from start to finish?
- How do mobile scanning apps work for sellers and collectors?
- How do you scan graded slabs and reflective cards without glare?
- What image settings and file formats should you use?
- How do you organize scans and export them for listings?
- How do you keep your scanner running and fix common problems?
- Pro tips from experienced collectors and sellers
- Your quick-reference scanning session checklist
- Why these workflows are worth getting right
- Nextgencards has the cards worth scanning
- Sources
What does a solid card scanning guide actually recommend for hardware?
Scanner type determines image quality, handling safety, and throughput more than any setting you dial in afterward. The two sensor technologies that matter most are CCD and CIS.
CCD vs. CIS: why it matters for slabs
CIS sensors sit close to the glass and have a shallow depth of field. For a flat raw card lying directly on the glass, that is fine. For a graded slab, which sits several millimeters above the glass surface, a CIS sensor often produces a soft, slightly blurry result. CCD flatbeds have a deeper focal range that resolves text and fine detail through slab plastic, which is why experienced hobbyists consistently recommend CCD models for graded captures. Entry-level flatbeds sold at office supply stores almost always use CIS sensors; check the spec sheet before buying.
Scanner categories and recommended models
CCD flatbeds are the standard for archival and slab work. They produce the highest color accuracy and depth of field at a moderate price. The Epson Perfection V600 is the most commonly cited hobby-standard CCD flatbed for this reason.
Contactless overhead scanners like the ScanSnap SV600 scan without touching the card at all. The card lies flat on a mat and the sensor arm passes over it. This is the safest option for slabs, thick top-loaders, and any card you will not risk running through rollers. Throughput is slower than a feeder, but the zero-contact approach protects condition.
Sheet-fed feeders are built for volume. The Fujitsu fi-8170 and fi-8250 are the models most often cited for dealer-level batch scanning. Both support PaperStream software profiles, auto-crop, and CSV export, which makes them practical for sellers who need to move dozens or hundreds of cards into an inventory system quickly. The tradeoff is that rollers are not safe for slabs, thick relics, or cards in soft sleeves.
Entry flatbeds and mobile apps cover casual raw cards and quick identification. They cost less and require no dedicated workspace, but they are not suited for archival-grade captures or high-volume dealer workflows.
| Category | Best For | Image Quality / DPI | Handling Safety | Throughput | Software / Features | Price Shape | Seller Suitability |
|---|---|---|---|---|---|---|---|
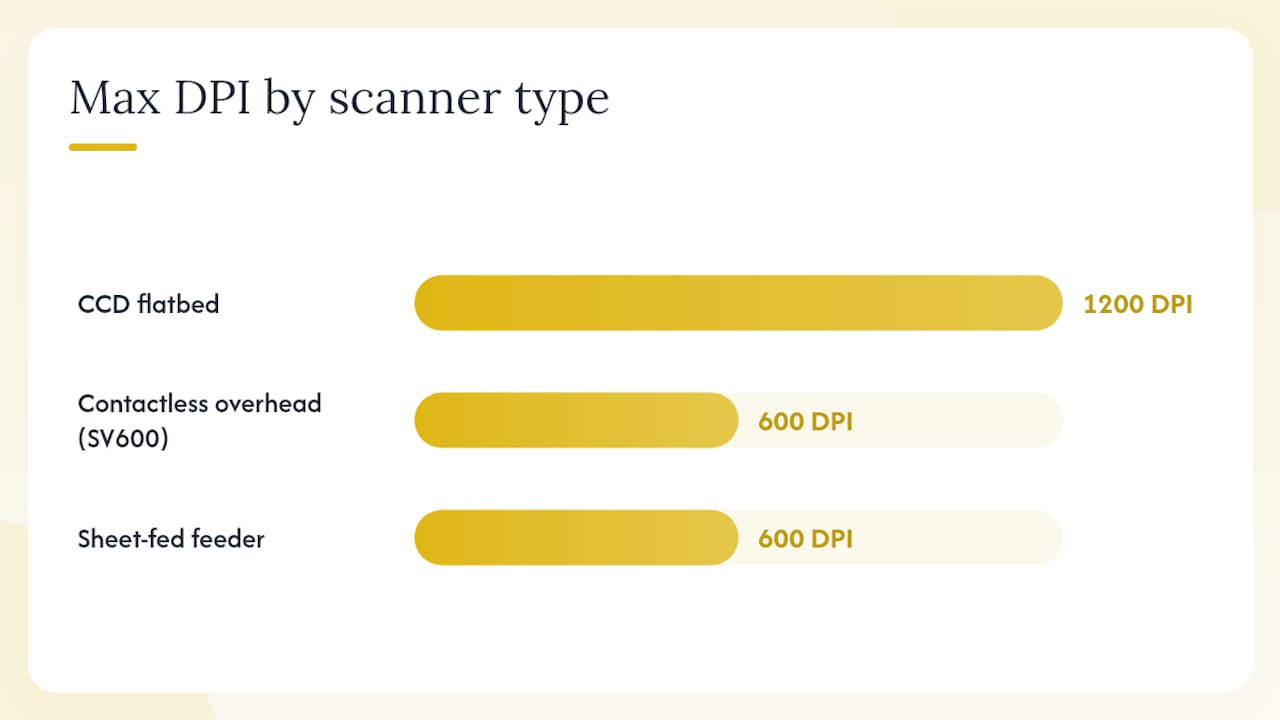
| CCD flatbed | Archival, slabs, rare cards | Excellent / up to 1200 DPI | High (no rollers) | Low (manual, one card at a time) | Basic scan software; manual export | $150 | Good for condition documentation |
| Contactless overhead (SV600) | Slabs, delicate, mixed inventory | Very good / up to 600 DPI | Highest (zero contact) | Moderate (semi-auto) | ScanSnap Home; batch profiles | $400 | Good; pairs with CSV export tools |
| Sheet-fed feeder (fi-8170 / fi-8250) | High-volume raw card batches | Very good / up to 600 DPI | Moderate (rollers; no slabs) | High (cards per minute batch) | PaperStream; auto-crop; CSV export | $500 | Excellent for dealer workflows |
| Entry flatbed / mobile app | Casual ID, raw cards, set-building | Adequate / 300–600 DPI | High (no rollers) | Low to moderate | App-based recognition; basic export | Free | Limited; manual listing |
Pro Tip: Match sensor type to the job before you buy. If your collection is mostly raw cards in penny sleeves, a CIS entry flatbed or a mobile app is sufficient. If you own graded slabs or high-value rookies, invest in a CCD flatbed or the SV600 before you scan a single slab on a cheap office scanner.
How do you run a scanning session from start to finish?
Each method below follows the same four-phase structure: prepare, capture, verify, and export. Pick the method that matches your hardware and card type.
Flatbed scanning (raw and slabbed cards)
Use a CCD flatbed for archival captures of raw cards and graded slabs. This is the most common method for serious collectors.
- Prepare: Wipe the scanner glass with a lint-free cloth. Remove dust from the card surface with a soft brush or air blower. Place the card face-down in the corner registration marks.
- Capture: For raw cards, close the lid and scan at 600 DPI minimum (1200 DPI for archival). For slabs, open the lid slightly or leave it fully open and dim the room lights to reduce glare from the slab plastic.
- Verify: Open the preview in your scan software. Check for blur, glare spots, and correct orientation. If glare appears on a slab, dim the room further or place a piece of black felt over the open lid.
- Export: Save as PNG or TIFF for archival. For listings, export a JPEG at 300–600 DPI in sRGB color profile.
Pro Tip: Placing a sheet of black construction paper or black felt over the card and lid when scanning slabs blocks ambient light and eliminates most glare without any software adjustment.
Contactless overhead scanning (SV600-style)
Use this method for slabs, thick top-loaders, or any card you refuse to risk on rollers.
- Prepare: Set the SV600 on a flat surface with the scan mat in place. Clean the mat surface. Place the card face-up on the mat.
- Capture: Open ScanSnap Home, select the card profile, and initiate the scan. The arm passes over the card without contact.
- Verify: Review the auto-cropped preview. Check that the full card edge is captured and no corner is cut off.
- Export: Use ScanSnap Home’s batch export or save individually. For CSV workflows, export to a folder and rename files using the naming convention covered in the organization section below.
Sheet-fed feeder (fi-8170 / fi-8250)
Use feeders only for raw cards in rigid sleeves or unsleeved. Never feed slabs, thick relics, or cards in soft penny sleeves.
- Prepare: Sort cards by finish type (glossy, matte, foil) before loading. Load no more than 20–30 cards at a time to reduce jam risk. Set the PaperStream profile for card stock.
- Capture: Start the batch. The feeder pulls cards through at speed. Monitor the first five cards to confirm no jams or double-feeds.
- Verify: Review the batch preview. Flag any cards that fed at an angle or show roller marks.
- Export: Use PaperStream’s auto-crop and batch rename. Export the CSV with card filenames for import into your inventory system.
Mobile camera rig (desktop setup)
A phone or mirrorless camera on a copy stand with a neutral gray background works well for condition close-ups and listing photos when a scanner is unavailable.
- Prepare: Set up a copy stand or tripod directly overhead. Use two diffused daylight LED panels at 45-degree angles to minimize shadows and glare.
- Capture: Shoot in RAW if your camera supports it. Keep the card parallel to the lens plane to avoid keystoning.
- Verify: Zoom in on the preview to check corner sharpness and surface detail.
- Export: Convert RAW to JPEG or TIFF. Crop to card edges in Lightroom or Photoshop.
How do mobile scanning apps work for sellers and collectors?
Mobile apps are best for fast identification, set-building, and light inventory management. They are not the right tool for archival-level detail on slabs or high-value cards where condition documentation matters.
App setup checklist:
- Grant camera and storage permissions during first launch
- Set sport and set filters to narrow recognition scope before scanning
- Choose a plain, well-lit background (white or light gray works best)
- Disable flash; use natural window light or a daylight LED panel instead
Scanning technique: Keep one card in the frame at a time, hold the device steady, and let the app auto-focus before triggering the capture. TCGplayer’s QuickScan documentation specifically recommends a plain, well-lit background, keeping the whole card in frame, holding the device steady to avoid blur, and disabling flash to reduce glare on reflective cards.
Session review: Do not commit cards to your collection mid-session. MTG Master’s scanning guide recommends using set filters and reviewing the full scanned session before committing entries, which catches misidentifications before they corrupt your inventory.
Export for sellers: Once a session is reviewed, TCGplayer’s app documentation walks through organizing cards into collections and exporting a CSV for mass import into point-of-sale or inventory systems. Map the CSV fields (title, set code, card number, condition, price) to your listing platform’s import template before uploading.
App comparison for sellers:
| App | Recognition Focus | CSV / Export | Listing Integration | Best For |
|---|---|---|---|---|
| TCGplayer | TCG and sports | Yes (CSV export) | TCGplayer marketplace | Sellers listing on TCGplayer |
| Ludex | Sports cards + TCG | Yes (built-in listing) | Direct listing features | Collectors wanting instant pricing |
| MTG Master | Magic: The Gathering | Session export | Manual | MTG collectors and traders |
Ludex offers instant recognition, real-time pricing based on marketplace sales, and built-in listing features, making it a practical choice for sports card sellers who want to move from scan to sale quickly. A 2026 app roundup notes that many serious users pair a fast scanner app with a separate operational management platform rather than relying on one tool for everything.
Troubleshooting common app issues:
- Wrong card identified: Apply tighter set filters and re-scan against a plain background
- No match found: Try manual add using the card’s set code and number from the back
- Glare causing failure: Move away from direct overhead lighting; use diffused side light
How do you scan graded slabs and reflective cards without glare?
Use a CCD flatbed or contactless overhead scanner for graded slabs. Sheet-fed rollers will damage slab holders and are not an option here.
The core problem with slabs and chrome or prism cards is reflected light. The slab’s plastic surface and the card’s foil finish both bounce light back at the sensor, washing out detail and making label text unreadable. Three techniques address this reliably.
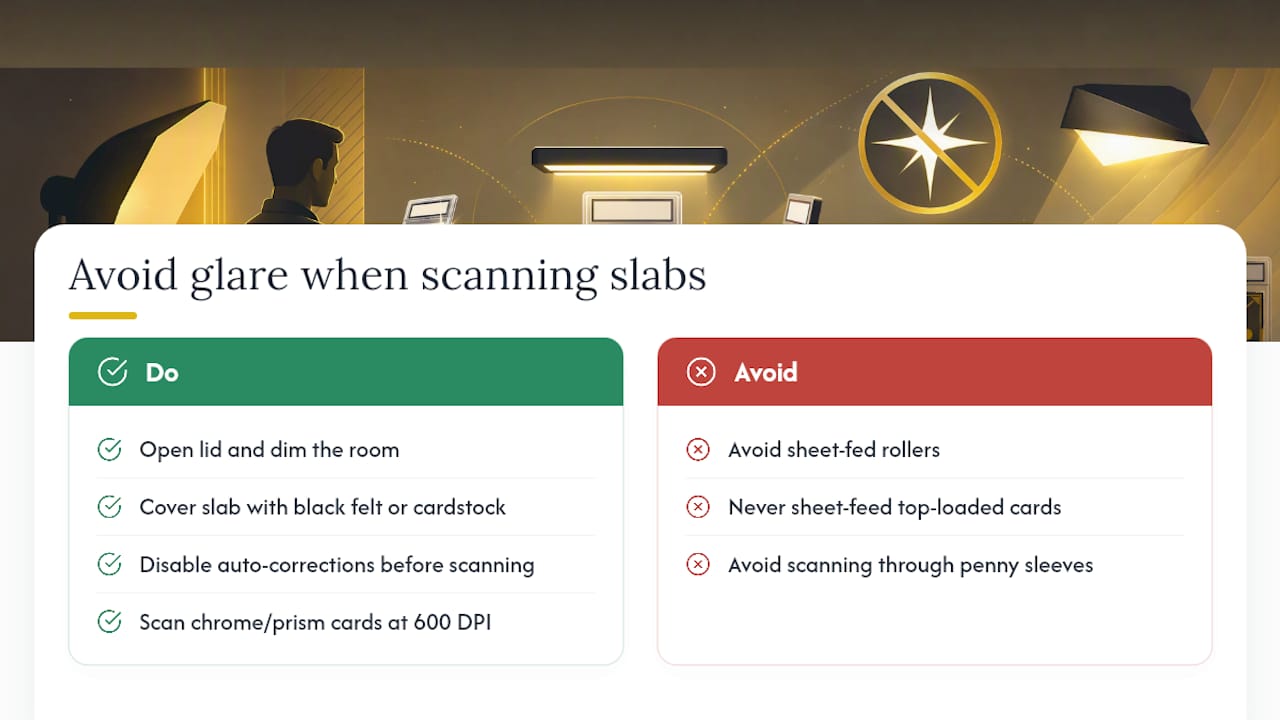
Open-lid technique: Lift the flatbed lid fully open and dim the room. With no lid pressing down and no overhead ambient light, the scanner’s own light source is the only illumination, and glare drops significantly. Place a piece of black felt or black cardstock over the slab after positioning it on the glass to block any remaining ambient light from above.
Disable auto-corrections: Turn off every automatic enhancement in your scan software before capturing slabs or chrome cards. Scryfall’s scanning guidelines recommend disabling auto-fix features for archival accuracy, and the same principle applies here: auto-sharpening and auto-color-balance can introduce artifacts that obscure the card’s actual condition.
Sleeve and top-loader guidance: For raw cards in penny sleeves, remove the sleeve before scanning on a flatbed. Penny sleeves add a layer of plastic that diffuses fine detail. Top-loaders are generally safe to scan through on a CCD flatbed; the rigid holder keeps the card flat and the added thickness is within CCD depth-of-field range. Never feed a top-loaded card through a sheet-fed feeder.
For chrome and prism cards specifically, scan at 600 DPI with the lid open, room lights off, and auto-corrections disabled. If glare persists on a specific area, rotate the card 90 degrees and re-scan; the angle of the foil pattern relative to the scanner’s light bar changes the reflection geometry and often eliminates the hot spot entirely.
Pro Tip: Save the raw, unedited scan file before doing any post-processing. If a buyer disputes condition later, the unmodified file is your objective record. Keep it in a separate “archive” subfolder alongside the listing-ready JPEG.
What image settings and file formats should you use?
The right settings depend on whether you are preserving a card for the long term or preparing a listing image for a marketplace.
Archival captures (preservation-grade):
- DPI: 600 DPI minimum; 1200 DPI for high-value or rare cards
- File format: PNG or high-quality TIFF (lossless compression preserves every pixel)
- Color profile: Adobe RGB or sRGB; do not let the scanner auto-convert
- Auto-corrections: Disabled entirely, per Scryfall’s archival guidelines
- Bit depth: 24-bit color minimum; 48-bit for museum-grade preservation
Listing images (sale-ready):
- DPI: 300–600 DPI is sufficient for web display and most marketplace requirements
- File format: JPEG at quality 90–95, saved in sRGB color profile
- Auto-corrections: Minor brightness and contrast adjustments are acceptable; avoid heavy sharpening
- Cropping: Crop to card edges with a 2–5 pixel border; do not crop into the card itself
File naming conventions: A consistent naming scheme prevents duplicate files and makes batch imports reliable. A practical format is: [Year]_[Set]_[CardNumber]_[Player]_[Condition] — for example, 2025_ToppsRevRev_RC101_NickKurtz_NM. Use underscores instead of spaces; most inventory systems and listing platforms handle underscores cleanly.
Storage and backup:
- Keep one local copy on an external SSD or NAS device
- Keep one cloud copy in Google Drive, Dropbox, or Amazon Photos
- Run a restore check quarterly: download a random file and confirm it opens correctly
- Separate archival TIFFs from listing JPEGs in distinct folder trees to avoid accidental overwrites
How do you organize scans and export them for listings?
A clear folder structure and consistent metadata are what separate a searchable archive from a folder of randomly named image files.
Recommended folder structure:
/Collection
  /[Year]
    /[Set Name]
      /Archive (TIFF or PNG originals)
      /Listings (JPEG exports)
      /Condition-Closeups (separate detail shots)
Metadata to capture per card: Set name, year, card number, player name, sport, condition grade, and a unique inventory ID. If you are scanning relic or patch cards, add a “relic type” field (jersey, patch, auto-relic) to the metadata so you can filter by card type during export.
CSV assembly for listings: Export your app or scanner software’s session data, then map fields to your listing platform’s import template. Standard fields for most platforms include: Title, Set Code, Card Number, Player, Year, Condition, Price, Image Filename. Keep the Image Filename column populated with the exact filename from your folder structure so the platform can match the image to the listing automatically.
High-volume sellers commonly pair a fast feeder scanner with software that auto-crops and matches card metadata, then export CSVs for inventory systems. Matching hardware to export workflow is where the real time savings appear, not in scanning speed alone.
For sellers listing on multiple platforms, maintain one master CSV and create platform-specific export views by filtering or reformatting columns rather than maintaining separate spreadsheets. This keeps your inventory ID as the single source of truth.
Backup and versioning: One local copy plus one cloud copy is the minimum. After any major scanning session, verify the cloud sync completed before closing the session folder. A simple restore check, downloading one file and confirming it opens, takes 30 seconds and catches sync failures before they become data loss.
For readers sourcing cards to scan and list, the Nextgencards guide on finding quality raw cards online covers what to look for before cards arrive at your scanning station.
How do you keep your scanner running and fix common problems?
Maintenance checklist:
- Clean scanner glass before every session with a lint-free microfiber cloth and isopropyl alcohol (70%)
- Inspect feeder rollers monthly for dust buildup and rubber degradation
- Update scanner firmware and PaperStream or ScanSnap software quarterly
- Run a deep clean (roller wipe, calibration sheet) every 500 scans or monthly, whichever comes first
- Store the scanner covered when not in use to prevent dust accumulation on the glass
Routinely cleaning scanner glass is the single most effective action to raise image quality and reduce editing time. Dust particles on the glass appear as white streaks or spots on every scan in a session, and they are invisible until you see them in the output.
Troubleshooting quick-reference:
- Blur on flatbed scans: Confirm DPI is set correctly and the card is lying flat against the glass. For slabs, switch to the open-lid technique.
- Glare on reflective cards: Dim ambient lighting, open the lid, and disable auto-brightness. Rotate the card 90 degrees if a specific area persists.
- Feeder jams: Remove the jammed card carefully without pulling against the roller direction. Check for bent corners or cards in soft sleeves that should not be in the feeder. Never force a card through.
- Misidentification in apps: Clean the background, apply tighter set filters, and re-scan. If the card is a short-print or regional variant, use manual add with the set code and card number.
- Streaks on every scan: A streak that appears in the same position on every image is almost always a piece of debris on the glass, not a card defect. Clean the glass and re-scan.
When to call a technician: If a feeder roller tears a card, produces consistent double-feeds after cleaning, or the scanner produces color banding that persists after calibration, stop using the device and contact the manufacturer’s support line. DIY roller replacements are possible on fi-series scanners but require the correct replacement kit from Ricoh/Fujitsu.
Pro tips from experienced collectors and sellers
These are the operational habits that separate efficient scanning workflows from sessions that eat an entire afternoon.
Before every session:
- Create a named scanner preset for each card type (raw glossy, raw matte, slab, chrome) so you never manually re-enter settings mid-session
- Batch cards by set and finish before you start; mixing glossy and foil cards in the same feeder pass increases misidentification and requires more post-processing
For sellers specifically:
- Photograph condition flaws (surface scratches, corner wear, print defects) as separate close-up shots and store them in the Condition-Closeups subfolder. Buyers who can see the flaw before purchase generate fewer disputes. Verifying item authenticity and condition documentation is a recognized best practice for building buyer trust on any marketplace.
- Keep the raw, unedited scan in the Archive subfolder even after you create the listing JPEG. The unmodified file is your objective condition record.
- Maintain a CSV that maps every image filename to its inventory ID. When a card sells, you can locate the image, the archive scan, and the condition notes in under 10 seconds.
Pro Tip: Serious hobbyists often run two parallel workflows: a mobile app for quick ID at shows or when sourcing, and a dedicated flatbed or contactless scanner for archival captures back at the workstation. The two tools serve different jobs and neither replaces the other.
For deeper context on set identification during scanning, the Nextgencards Collector’s Guide covers sports card manufacturers, set structures, and card types that affect how you batch and label your scans.
Your quick-reference scanning session checklist
Print or save this checklist and run through it at the start of every session.
Workspace setup:
- [ ] Scanner glass cleaned with lint-free cloth
- [ ] Cards sorted by type (raw, slab, chrome/foil, relic)
- [ ] Scanner preset selected for current card type
- [ ] Ambient lighting dimmed (for slab or reflective sessions)
- [ ] Plain light-colored background ready (for mobile app sessions)
Capture:
- [ ] DPI set: 600 DPI for listings, 1200 DPI for archival
- [ ] Auto-corrections disabled (archival sessions)
- [ ] File format selected: TIFF/PNG for archive, JPEG for listings
- [ ] First card previewed and verified before full batch starts
- [ ] Flash disabled (mobile app sessions)
Handling rules:
- [ ] No penny sleeves in sheet-fed feeders
- [ ] Slabs and top-loaders on flatbed or contactless only
- [ ] Cards handled by edges only; no contact with card face
Verify and export:
- [ ] Batch preview reviewed for blur, glare, and orientation errors
- [ ] Files named using
[Year]_[Set]_[CardNumber]_[Player]_[Condition]convention - [ ] Archive copies saved to local drive
- [ ] CSV exported and field-mapped for listing platform
- [ ] Cloud backup confirmed (sync completed)
A downloadable version of this checklist is available as a printable template. [Download the scanning session checklist template — placeholder for file link.]
Why these workflows are worth getting right
There is a tendency in the hobby to treat scanning as the boring part, the administrative step between acquiring a card and listing it. That framing undersells what a good scan actually does.
A high-resolution, unedited scan is the closest thing to an objective condition record a collector has. When a buyer disputes a card’s condition after purchase, the scan is the evidence. When a card appreciates and you want to document its state at acquisition, the scan is the record. When you are building a collection of rookie autographs and relics and want to track what you own across hundreds of cards, the scan is the catalog.
The workflows in this guide are not about perfection for its own sake. They are about protecting the value of cards that are worth protecting, and moving volume efficiently when volume is the job. The distinction between a CCD flatbed and a CIS entry scanner matters because slabs are expensive. The distinction between a feeder and a contactless scanner matters because rollers do not care what a card is worth.
Nextgencards has the cards worth scanning
Once your scanning workflow is dialed in, the next question is what to put through it. Nextgencards specializes in rare rookie autographs, patch cards, relics, and redemption cards from current and iconic MLB, NBA, and NFL players — the kind of inventory that justifies a proper archival scan and a condition-documented listing. Cards like the 2025 Nick Kurtz Topps Reverence Autograph Rookie RC show exactly how sale-ready images and condition notes translate to buyer confidence at the listing level. Free shipping is available on select items.
Browse the full rookie autographs and relics collection to find cards that are worth scanning, archiving, and listing at their full value. This is an optional resource; the scanning workflows in this guide apply to any card collection regardless of where the cards were sourced.
Sources
- How to Capture Images for Scan & Identify Using QuickScan Mobile App – TCGplayer.com
- How to scan trading cards: The ultimate guide
- Scanning guidelines — Scryfall
- MTG Card Scanner Guide | MTG Master
- LUDEX Sports Card Scanner +TCG App - App Store
- Best Sports Card Scanner Apps in 2026, Tested & Ranked | Slabfy
0 comments